So I don’t know about you, but I’m often frustrated by the ridiculous smallness of girls’ pockets. At a bare minimum, I need to be able to shove my cellphone in there – come on, pants companies! So what I started doing was making myself pocket extenders. I’ve done this several times, for pants and shorts. It’s great.
I just got this pair of jeans, so I thought I’d show you how to do it. I kind of feel like it just hasn’t occurred to some of you that this is an option, so maybe now it will. All you need is your pants, some fabric (I just took a random piece from a scrap bin), a needle, and some thread (thread doesn’t even need to match the fabric since literally no one will see it).
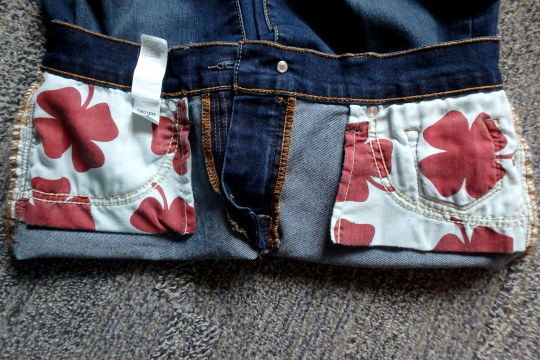
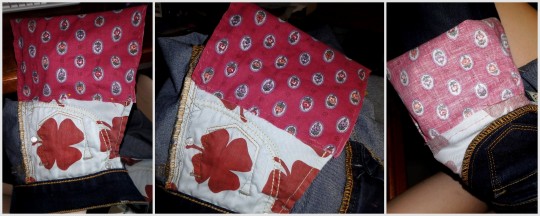
See? Ridiculous. Like, half a cellphone, or only 2.5″. Useless.
So turn those inside out to expose the pockets.
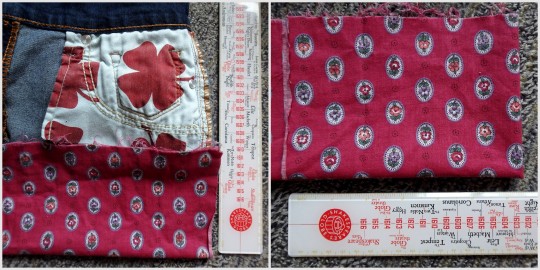
Figure out how big you want your pockets to actually be. I kinda go by whatever looks like might be right. I didn’t
really measure them. Fold the fabric in half, so you have a pocket, and
then fold it in half again so you can have two equal ones.
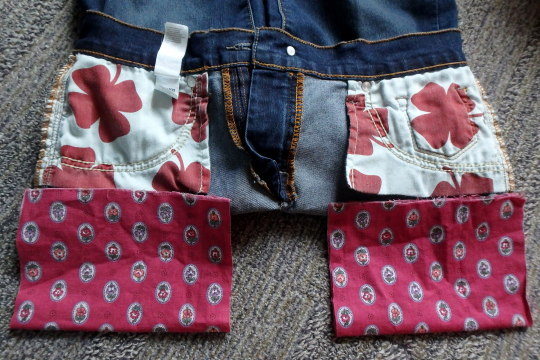
Try to get the edges to line up enough, pin it in place, then sew up the sides! Are your stitches crazy uneven and wonky looking? Doesn’t matter; nobody’s going to see it. These are in the inside of your pants. The only thing that matters is that it holds up. So I double-did the corners, since those tend to get the most stress.
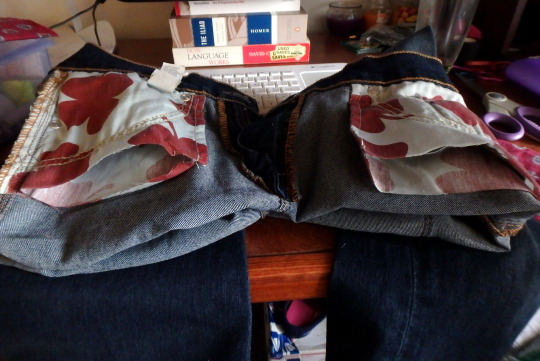
Cut open the bottom of the existing pockets.
Pin it in place, then sew around, joining the new pocket to the old pocket. I did this by keeping my hand on the inside, so I wouldn’t accidentally sew through the other side. Again, I reinforced the corners, and didn’t worry about what it actually looks like. Then I turned it in side out to make sure the inside was all joined properly.
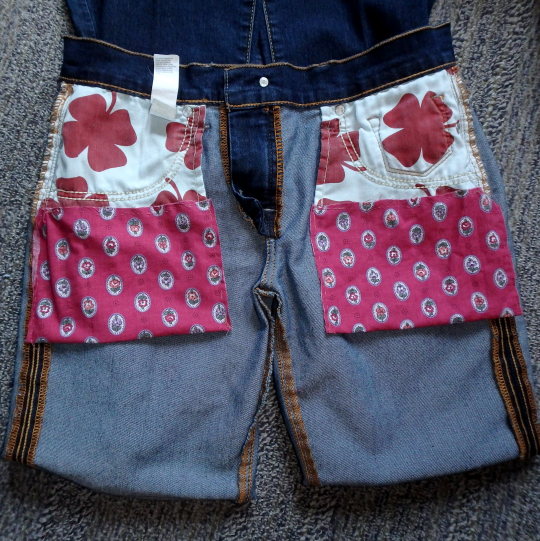
Yay all done! And the pockets are so much bigger now!
Whaaaat I can fit my entire phone and entire hand and probably something else now, are girls’ pockets even allowed to do that?! Heck yeah they are.
“It ran away.”
No. That’s not fair.
It’s dead. It’s not coming back. Don’t do that to a child. Death is really important to understand.
YES they might be heartbroken over it but you need explain the truth to them as best you can depending on their age. It will help them understand loss.
I learned about death from an early age watching lions rip apart buffalo on animal planet. That bitch is DEAD. lol.
When my cheap ass fish would die, they where dead. They went up to “fishy heaven”. When one of my cats died, it was dead. It went to “kitty heaven”. My mom used to read me a book about how things that die go to heaven. I was sad but my tiny, imaginative child brain could grasp the concept of my animals going to a “happier” place because they were sick.
I just don’t see why or how lying is better other than to protect their little feelings. No one wants to see their child sad but like I said before, I think it’s important to understand loss. Kids get hurt, it happens, it prepares them for adult life.
I’m no parenting expert and I know there are plenty of reasons I wouldn’t understand as to why people think lying would be better. This is all just a pet peeve of mine.
Okay so I’m a mortician-in-training and, right now, I’m taking the required thanatology class which is all about death, dying and bereavement. Our most recent readings were all about children and how to help them make sense of the loss and separation of a loved one. Apparently, most adults seem to think children don’t grieve but they do. Children essentially have seven stages of grief: shock, alarm, disbelief, yearning, searching, disorganization, and resolution. Their grief is harder to understand and assess because they have neither the vocabulary nor life experience to easily express their feelings and needs. A child’s belief structure and how they respond to death is determined by their age/developmental level, the manner of the death, and their relationship with the deceased.
Birth – 2 yrs: only non-specific distress reactions
2-5 yrs: don’t understand the permanence of death; concerned about physical well-being of deceased; not capable of cognitive reciprocity; may want to see and touch deceased’ repeatedly asks same questions about deceased; may act as if death never happened or in a regressive manner; may experience guilt (like, if they once said something like “I wish so-and-so would go away forever, they might think they caused the death)
6-9 yrs: more complex understanding; realize death is irreversible and that its universal; find it difficult to believe that death will happen to them (believe it happens only to older people); death can be personified and this allows them to run and hide from it; tendency to engage in “magical thinking” (don’t let them do this, its as bad as you lying to them; keep them grounded in the reality of the death), have strong feelings of loss but have extreme difficulty expressing it; often need permission to grieve
9-12 yrs: have cognitive understand to comprehend death is a final event; can understand and accept a mature, realistic explanation of death; short attention spans (they could be sad and grieving one moment and laughing joyfully the next, and someone could see that and negatively comment on it. Like, “how can so-and-so be acting like that?” This can intensify their already fluctuating emotions and present feelings of guilt and low self-worth); their vocabulary is advanced enough to express their feelings but they may not want to talk about what’s bothering them (they’ll let it build up and manifest in behavioral problems); interest in the physical aspect of death and what happens after; may imitate decreased’s mannerisms
13-18 yrs: understand the meaning of death; realize its irreversible and happens to everyone; normal puberty will intensify grief by adding to already conflicting emotions; often put in position of being the protector, comforter, caregiver (feel they must comfort others t their wen emotions are suppressed; they’ll look find on the outside but be falling apart inside); experience conflicting feelings about death (try to overcome fears by confirming control of their mortality; risk taking behavior); males are more likely to express grief in aggressive behaviors while females need comfort, to be held and reassured
There’s basically 10 rules:
Tell them ASAP: its important to start with what they know about death and then expand on that; be gentle and trustful; tell them in a comfortable, safe and familiar place and make sure its in language they’ll understand; never assume they understand the way you do
Be truthful: kids can sense dishonesty ok?! So don’t create lies to protect them; don’t make up stories that’ll have to be changed later on cause that only confuses them and promotes emotional instability; don’t withhold information either (within reason, see #3), place emphasis on the facts, and avoid euphemisms (i.e., “passed away”, “departed”, “went away”, “got sick” (they’ll associate illness and death go hand-in-hand and may think a common cold will kill them), etc)
Share only details they’re ready to hear: truthfulness should be balanced with their readiness for details (like, tell them someone died in a horrible auto accident but maybe not say they were decapitated and their head flew off down the highway in the process); children with actualize a crisis like an adult; its not uncommon for them to ask about a death later in life and that provides the opportunity to deliver info that wasn’t previously shared (i.e., the decapitation)
Encourage expression of feelings: a child will experience stages of grief very similar to those of adults (adults typically follow the Kubler-Ross 5 stages while kids have 7, seen above) and they rely on adults for permission to “feel” loss; best way is for them to learn is to hear and watch adults because they get their understanding of grief through their senses; its not unusual for them to go up to people and just make a statement like “My dad died” cause they want to see how that person will react and give them a clue as to how they should react, so its important for adults to “feel” their grief in the presence of the child; explain why you’re sad and reassure them that its okay for them to feel sad and cry and that its okay if they aren’t
Take child to the funeral: seeing is believing; they should be given the option to view the body but don’t force them; a funeral can be a positive experience but their level of involvement in the funeral process should be their individual decision; give them the choice as to the extent of their involvement
Take child to the cemetery: it can be comforting to them to know where the body is buried and how it got there; it can also help them direct their grief at an appropriate object (this lessens emotional disorganization), and it lessens the child’s chances of denying or avoiding the death
Let them tell others about death: adults “talking over” kids creates anxiety; when the child can explain it to another person, in their own words, they feel more in control and have a greater understanding; let them speak!
Encourage talk of the loss: this allows feelings to be expressed and incorrect ideas about any aspect of the loss to be corrected
Be available to answer questions: you need to answer each question as sincerely and accurately as possible; understand that some can’t be answered but simply being available is important; and be patient cause they will ask the same question repeatedly
Never tell them how they should or shouldn’t feel: you don’t like it when people do it to you, so don’t do it to kids; they should be encouraged to express any feeling and they should feel accepted for it; being told “not to feel” a certain way leads to emotionally “playing dead” and that’ll create repression, which creates interpersonal conflicts in later life due to inability to communicate emotions
The 75 most common words make up 40% of occurrences
The 200 most common words make up 50% of occurrences
The 524 most common words make up 60% of occurrences
The 1257 most common words make up 70% of occurrences
The 2925 most common words make up 80% of occurrences
The 7444 most common words make up 90% of occurrences
The 13374 most common words make up 95% of occurrences
The 25508 most common words make up 99% of occurrences
This article has an excellent summary on how to rapidly learn a new language within 90 days.
We can begin with studying the first 600 words. Of course chucking is an effective way to memorize words readily. Here’s a list to translate into the language you desire to learn that I grabbed from here! 🙂
EXPRESSIONS OF POLITENESS (about 50 expressions)
‘Yes’ and ‘no’: yes, no, absolutely, no way, exactly.
Question words: when? where? how? how much? how many? why? what? who? which? whose?
Apologizing: excuse me, sorry to interrupt, well now, I’m afraid so, I’m afraid not.
Meeting and parting: good morning, good afternoon, good evening, hello, goodbye, cheers, see you later, pleased to meet you, nice to have met.
Interjections: please, thank you, don’t mention it, sorry, it’ll be done, I agree, congratulations, thank heavens, nonsense.
Space: into, out of, outside, towards, away from,
behind, in front of, beside, next to, between, above, on top of, below,
under, underneath, near to, a long way from, through.
Time: after, ago, before, during, since, until.
DETERMINERS (about 80 words)
Articles and numbers: a, the; nos. 0–20; nos. 30–100; nos. 200–1000; last, next, 1st–12th.
Demonstrative: this, that.
Possessive: my, your, his, her, its, our, their.
Quantifiers: all, some, no, any, many, much, more, less, a few, several, whole, a little, a lot of.
Universal: everyone, everybody, everything, each, both, all, one, another.
Indefinite: someone, somebody, something, some, a few, a little, more, less; anyone, anybody, anything, any, either, much, many.
Negative: no-one, nobody, nothing, none, neither.
ADVERBS (about 60 words)
Place: here, there, above, over, below, in front, behind,
nearby, a long way away, inside, outside, to the right, to the left,
somewhere, anywhere, everywhere, nowhere, home, upstairs, downstairs.
Time: now, soon, immediately, quickly, finally,
again, once, for a long time, today, generally, sometimes, always,
often, before, after, early, late, never, not yet, still, already, then
(=at that time), then (=next), yesterday, tomorrow, tonight.
Quantifiers: a little, about (=approximately), almost, at least, completely, very, enough, exactly, just, not, too much, more, less.
Manner: also, especially, gradually, of course,
only, otherwise, perhaps, probably, quite, so, then (=therefore), too
(=also), unfortunately, very much, well.
CONJUNCTIONS (about 30 words)
Coordinating: and, but, or; as, than, like.
Time & Place: when, while, before, after, since (=time), until; where.
I love it too! I love it mostly because it makes me feel less overwhelmed. When you break it down like this, everything seems so much more manageable. Like, hey, I could memorize 20 words at a time (even if ‘at a time’ varies wildly for me), and just do that like ten times. That’s a HUGE chunk of a language.
(And since I have the habit of doing languages that are similar to ones I’m already familiar with, the grammar part usually comes pretty easy, too.)
as a child, i had this really interesting way of dealing with executive dysfunction:
when i needed to do something but did not get the impulse to actually start, i counted to 20.
and at 20, i did the thing.
i started this in order to get me out of bed in the morning, and after a few weeks it was a reliable source of starting impulses. every time i hit 20, i got started.
somewhere along the way i stopped doing it, because it was weird and nobody else needed to count in order to do stuff.
it makes me wonder, how many brilliant coping skills do we loose or never develop because we live in a neurotypical world and nobody teaches us these things? because we think they’re weird, because we don’t have words for what we’re doing, because they seem to have no place in this world?
Let me start off by showing you this wonderful tutorial for machine-sewing armsocks. It takes much less time and looks much much cleaner than the traditional method of sewing armsocks by hand! I have used this method 4 times now, and it works beautifully. (Note: Please read through the full tutorial there before reading the rest of this post)
This tutorial left me with many questions. The main one being: Where do I find tights to match my makeup? I didn’t want to bother with a UK seller, where I believe the tights in this tutorial are from (but don’t quote me on that). I would prefer a Chinese seller because they’re often cheaper. SInce I was recently entrusted with making several pairs of armsocks for others, I wanted something that worked well but wasn’t overly expensive. After much searching and ordering from several different sellers, I have found that by far these tights on eBay in #17 Gray are the most satisfactory. One pair of tights is only $5! Because there are so many different shades of grey out there, the color I use for my troll makeup is Ben Nye Character Base in CB-8 Ghoul Grey, bought at my local costume shop for only $6, and it matches these tights excellently, as seen above.
The first revision I did with this tutorial is a simple running stitch instead of using fabric chalk to “find” the cardboard cutout inside. I completely avoided doing the chalk impression of the cardboard cutout, because as you can imagine, drawing on stretchy fabric is infuriating. The other benefit of using the running stitch is that it will hold down the fabric and keep it from shifting too much while you’re sewing it down with the close machine stitch. Again, it’s because the fabric is stretchy and therefore harder to control. Note: Please use a small needle to tack down your tights around the cardboard. It will be less likely to make the tights run.
Next, instead of using clear nail polish, which can poke against the skin and feel rough, I recommend using Fray Check instead. It looks like this.
You can find it pretty much anywhere that sells fabric, including Wal-Mart, and it only costs about $5. If you don’t know what Fray Check is, it’s a liquid that keeps fabrics from fraying, and is extremely useful if you come to a point where your tights begin to run (for example, if there are horizontal lines where the weaving is starting to come undone. This is not a big issue with these tights, as long as you’re careful and you use small needles). The fabric of these tights absorbs Fray Check well, and I recommend doing it on the stitching itself and maybe 1cm around it when the machine sewing has been done and the fabric trimmed (trim it closely to prevent bumps, but not so closely that the stitching will come undone).
While sewing my tights, I noticed that I was getting very itty bitty zigzags and misplacement of the needle in my stitches. As long as they are very small, DO NOT go back and try to fix them with your machine! You may end up catching the fabric and making matters much worse! I left them alone and finished up the armsocks, and wouldn’t you know it, you couldn’t even tell! If anything, after finishing the armsocks if you notice any issues, THEN go back with a small hand-sewing needle and get them a little more even.
Another thing to note: DO NOT use battery-powered pill shavers on armsocks! I wouldn’t even recommend a razor. The one time I attempted this, it took a small chunk of fabric with it! Just ignore it.
Lastly, it’s not so much a revision as it is something that should be noted, but use a small needle on your machine! It will be much less likely to pull the stretchy fabric (also note: I have noticed that Ball Point needles pull the fabric, so avoid those), and will give you a straighter line as a result.
Everything else in the tutorial seems to work well. The hot glue works just fine for gluing the nails on (I was lucky and got to use a low heat glue gun), they fit well. Etc etc.
EXTRA: If you noticed the stitching in the first picture of this post, DO NOT FRET. It is not very noticeable except for in extreme close-ups. Here are my pictures to prove it:
Nitpicky stuff: I would recommend pulling the fabric out from underneath your wrist and pinning it before you do the wrist stitch. I prefer having the wrist stitch under my wrist instead of on the side, because it’s much less noticeable (if you look closely at that last picture you can see my wrist stitch at the base of my palm). If you don’t have another set of hands to help you gently pull the fabric so you can pin it properly, use your toes to grab it! That’s what I did.
If you guys have any other questions regarding armsock construction that I did not answer here, please feel free to send me an ask!
This free app is a gentle way to stay focused! Available on most app stores, Forest allows you to set a timer for staying away from distractions on your phone or tablet. If you can get through the set time without leaving the app, it will plant a small digital tree for you! You can also track progress over previous months and earn achievements.
This is a FREE fan-made game for PC that re-creates the classic feel of the Pokémon games you know and love, but with new twists and turns! Explore the lush, diverse Tandor region and discover and capture more than 150 NEW species of Pokémon. Gather all 8 Gym Badges, and take on the Tandor Championship to be the very best, like no one ever was!
Plus, battle and trade with your friends using the Online Features! This game includes trading, battling, as well as a GTS and Wonder Trade to help you on your quest to catch ‘em all!
And that’s not all! Here’s some of the other features that make Pokémon Uranium unique:
A Custom Soundtrack
A new type of Pokémon, the Nuclear type
A different kind of story – save Tandor from a Nuclear crisis!
Nuzlocke Mode
Multiple Save Files
3 Playable Characters, including a gender neutral protagonist
…And more!
Pokémon Uranium is an original game, not a ROM Hack, which means you won’t need any extra programs to play it. Simply install it and launch Uranium.exe to begin your new adventure!
From all of us on the Uranium Team, we hope you enjoy playing!
So i spent a pretty long time doing this, but im pretty proud of my self.
So this is for any one that wants to read the Warrior Cats series.
Personally its difficult to keep up and read these books since there are just so many, and books, Are not cheap. So i dug around looking EBERYWHERE for them wanting to reread them and i wanted to share with you guys if you have the same difficulty of buying books if you dont really have the money (or lack of library like me)
So here is a full compilation of every single warriors book.
There are a few programs I use on an almost daily basis as an artist and illustrator which I find invaluable, but that seem to be unfortunately more secret than they deserve to be. Which is too bad, because they solve a lot of small workflow problems that I think a number of people would find useful!
I’ll keep this list limited to my big three, but it is organized in order of usefulness. (And incidentally of compatibility, as the latter two are Windows-only. Sorry! Please do still check out PureRef though, Mac users.)
PureRef is a program specifically designed to make it easier to view, sort, and work with your references. I actually put off downloading it initially because it seemed redundant– couldn’t I just paste the refs into my PSD files? Indeed, the only real barrier to working with PureRef is that learning the keyboard shortcuts and the clicks to move around the program takes a little while. But getting over that hump is well worth it, because it has some distinct advantages over trying to organize your refs in your actual art program.
Firstly, you’re no longer bogging down your actual PSD file with extra layers, nor having to fight with said layers at all– PureRef has no layer panel, so you never have to scramble to grab the right one. All images you paste into the program retain their original resolution data, so you can resize, rotate, crop, etc as needed without distortion. If you find yourself needing to adjust the values, color, etc of a ref image, you can just copy paste it into Photoshop, make your adjustments, and copy paste it back into PureRef.
The other great advantage is that you can toggle the program as ‘Stay On Top’ and keep it above Photoshop (or whatever else)– which was always a problem when trying to make a reference collage in a separate PSD file. I find that I just don’t look at my references as much as I should when they are on a second monitor, and this solves that problem.
I’ve used it religiously for about a year now, creating a new PureRef file for every illustration I do, as well as a few for specific characters, cultures, or settings in personal projects. As you can see in the example above, I like to sort my images into little clusters or ‘islands’ of specific content, so that I can easily scroll out to see the entire reference map, then zoom in to the relevant cluster easily.
There is one big tip I would suggest for using this program, if you have the harddrive space: As soon as you get it, turn on the ‘Embed local images in save file’ option. This will make your PureRef files bigger, but you’ll never have to deal with a ‘broken link’ if you move around the source files you originally dragged in.
This is such a simple little app that it doesn’t have a very formal name, though I think of it as ‘Work’ or ‘Work Work’ (for some reason.) It’s a timer that counts when your cursor is active in any (of up to 3) program you set it to count for, and stops counting when you change programs or idle. No starting, pausing, stopping, or forgetting to do any of those three things.
I use this one to accurately track my hours, both to inform myself and for commissions or other client work. At the end of a work session, I take the hours counted and add them to the hours I’ve already spent on that image in a spreadsheet.
I have it set to count my three art programs (Photoshop, Painter, and Manga Studio), so based on the settings I use, it doesn’t count time that I spend doing relevant work in my browser (such as looking up an email to double check character descriptions or ref hunting), so to counter that, I set the ‘Timeout’ option in it’s menu to 360. This means it will count to 360 seconds of cursor inactivity before it considers me idle and stops counting. Since it instantly stops counting if you switch to ‘non-work’ a program, I figure this extra time just about cancels out relevant time that it ignores in ‘non-work’ programs by counting an extra minute or so when I walk away from the computer to grab some water or what-have-you.
I use Carapace the least of these three, since my work doesn’t often have a need for creating perspective lines. But when there is architecture involved in something, this proves invaluable in simplifying that process.
Carapace lets you copy paste an image into it, and then drop in vanishing points and move them around to create perspective lines. (Though you’ll want to scale down your full res drawing or painting a bit to avoid lagging the program.) Like with PureRef, fighting the shortcuts is the worst part of it, though for myself it’s more of an issue in this program because I don’t use it often enough to remember them. Still, it gets the job done, and it’s easy to adjust the points to feel things out until you get them ‘right’. Then you just copy and paste the grid back into your art program and you’ve got that information to use as need be on its own layer.
Of course, using Carapace isn’t a replacement for actually knowing how perspective works– you still have to have a sense of how far apart the vanishing points should be placed to keep things feeling believable. But it sure does save you a lot of trouble once you do have that knowledge.
So, there are my big three recommendations for programs to help your art workflow. I hope people find them useful– if you do, please share so that they climb a little higher out of their unwarranted obscurity! And if you’ve got a favorite tool like this that I didn’t cover, feel free to share it in the comments. I know I’m curious to see what else is out there, too. Also, if Mac users have any suggestions for programs that fill similar functions, feel free to share there as well!